
How to Hang Pendant Lights: A Step-by-Step Guide for Beginners
Summary›
There's something undeniably transformative about the right pendant light. Whether you're illuminating a kitchen island where morning coffee becomes a ritual, or casting a warm glow over a dining table where friends gather, pendant lights bring both function and that coveted Scandinavian hygge feeling into your home. But before you can enjoy that perfect ambiance, there's one essential step: learning how to hang pendant lights correctly and safely.
If you've been eyeing an art deco chandelier or modern pendant for your space but feel intimidated by the installation process, you're not alone. Many homeowners assume electrical work requires a professional, but with the right guidance, tools, and a bit of confidence, DIY pendant light installation is entirely achievable—even for beginners. In this guide, we'll walk you through everything from gathering your tools to achieving that professional, gallery-worthy finish that makes your space feel intentionally curated.
Preparing for Your Pendant Light Installation
Before you climb that ladder, proper preparation is key to a smooth installation. Taking time to plan will save you frustration and ensure your new lighting looks as intentional as the rest of your Scandinavian-inspired space. For those looking to explore more options, our Pendant Lights collection offers a curated selection of fixtures perfect for any room.
Tools and Materials You'll Need
Gathering the right tools before you start will make your pendant light installation much smoother. Here's what you should have on hand:
- Voltage tester – Essential for safety; confirms power is off before you begin
- Wire stripper – For preparing electrical connections
- Screwdrivers – Both flathead and Phillips, depending on your fixture
- Adjustable wrench – For securing mounting hardware
- Measuring tape – Critical for achieving proper pendant lighting height
- Level – Ensures your fixture hangs straight
- Wire nuts – For secure electrical connections
- Electrical tape – Provides additional safety for wire connections
- Drill with bits – If you need to create new mounting points
- Stud finder – Helps locate ceiling joists for secure mounting
Most pendant lights come with the necessary mounting hardware, but double-check your package contents before starting. The Matte Black Glass Pendant - 10" includes all standard mounting components, making it an excellent choice for first-time installers.
Understanding Pendant Light Placement: Height and Spacing
One of the most common questions in pendant light installation is about placement. Getting the height and spacing for pendant lights right makes the difference between a fixture that looks professionally installed and one that feels awkward or impractical.
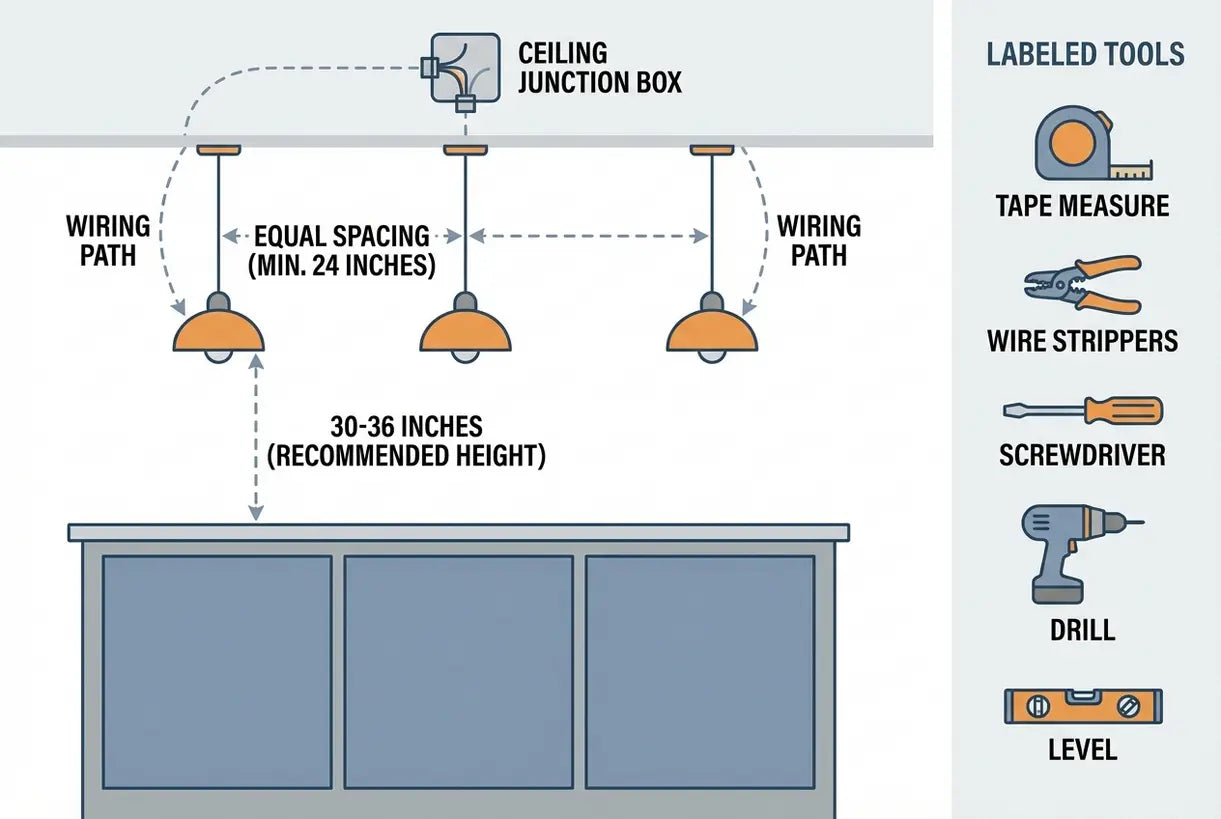
Golden Rule for Kitchen Islands: Hang pendant lights 30 to 36 inches above the countertop surface. This provides ample task lighting without obstructing sightlines across your kitchen.
For dining tables, the general guideline is to hang your pendant or chandelier approximately 30 to 36 inches above the table surface—adjusting slightly based on your ceiling height. Higher ceilings may require dropping the fixture a bit lower to maintain intimacy, while lower ceilings might need you to raise it slightly.
When installing multiple pendants, spacing for pendant lights should typically be 24 to 30 inches apart, measured from the center of each fixture. This ensures even light distribution without overcrowding. If you're working with a kitchen island, divide the length of the island by the number of pendants plus one to find optimal spacing.
Step-by-Step Pendant Light Installation Guide
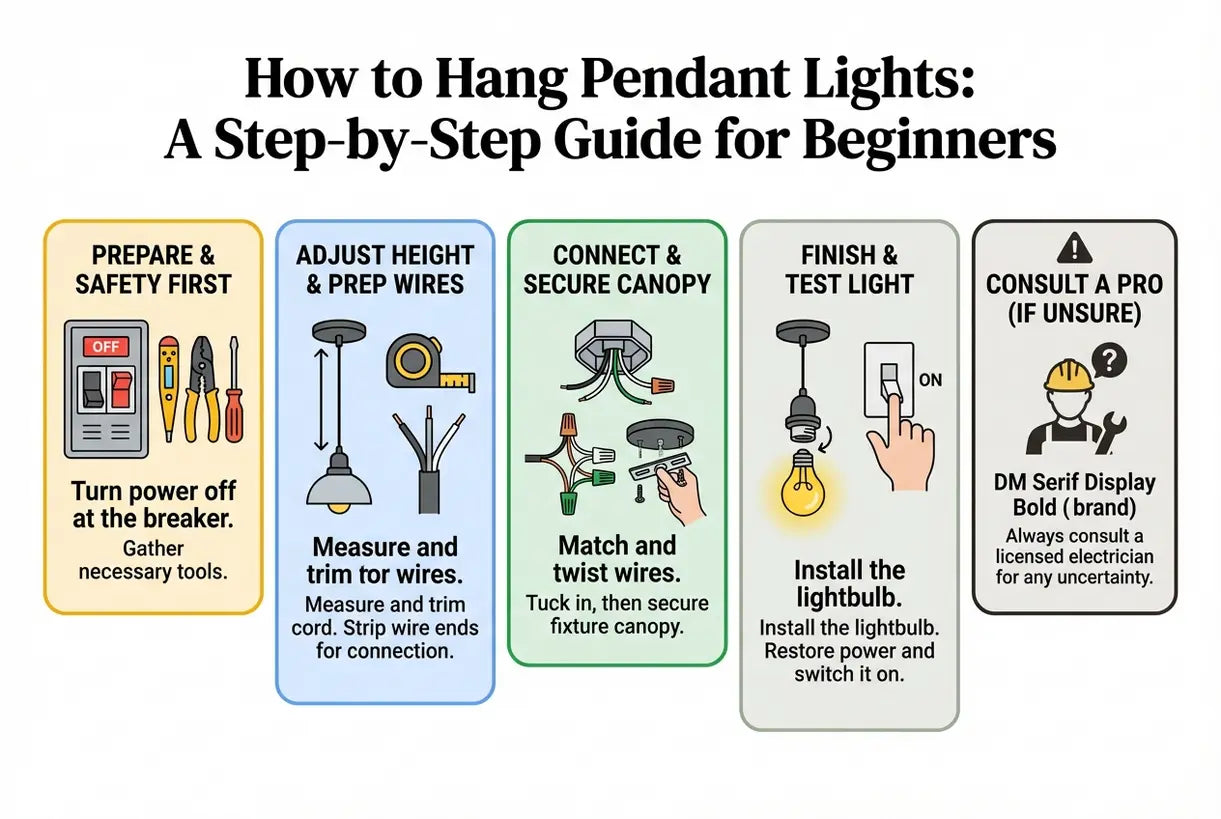
Now that you've planned your placement and gathered your tools, it's time for the actual installation. Follow these steps carefully, and remember: if at any point you feel uncertain about the electrical work, consulting a licensed electrician is always the wisest choice.
Step 1: Turn Off the Power
Safety is paramount in any electrical project. Start by turning off the circuit breaker that controls the existing light fixture. Use your voltage tester on the wires at the ceiling box to confirm there's no power flowing. Never skip this step—working with live wires is dangerous and unnecessary.
Step 2: Remove the Existing Fixture
If you're replacing an old light, carefully remove it by unscrewing the mounting hardware and disconnecting the wires. Take note of how the wires were connected—typically black to black (hot), white to white (neutral), and green or bare copper to ground. This will guide your new installation.
Step 3: Assess Your Junction Box
A critical question many beginners ask is: Do pendant lights need a junction box? The answer is yes—absolutely. A properly rated junction box is essential for safe installation. It provides the structural support needed to hold your fixture's weight and protects the electrical connections. If your ceiling doesn't have a junction box where you want the pendant, you'll need to install one or hire an electrician to do so.
Step 4: Install the Mounting Bracket
Most pendant lights come with a mounting bracket that attaches to the junction box. Secure this bracket using the provided screws, ensuring it's tight and stable. This bracket will bear the weight of your fixture, so don't rush this step.
Step 5: Connect the Wires
This is where your pendant light wiring guide knowledge comes into practice. Connect the wires following standard electrical protocol:
- Match the black (hot) wire from your pendant to the black wire from the ceiling
- Connect the white (neutral) wires together
- Join the ground wire (green or bare copper) to the ceiling's ground wire or grounding screw
Use wire nuts to secure each connection, twisting them clockwise until tight. Wrap each connection with electrical tape for added safety. Gently tuck the wires into the junction box, being careful not to dislodge your connections.
Step 6: Adjust the Cord Length
Before attaching the fixture canopy, adjust the cord to your desired height. Many modern pendants, like the Brushed Brass Mini Pendant - 8", feature adjustable cord lengths that make this step straightforward. Remember our height guidelines: 30-36 inches above countertops for kitchen islands, and adjust accordingly for dining tables.
Step 7: Attach the Canopy and Secure the Fixture
Slide the decorative canopy up to the ceiling, covering the junction box and mounting hardware. Secure it according to your fixture's instructions—usually with a locknut or decorative cap. Use your level to ensure the fixture hangs straight, making any necessary adjustments.
Step 8: Install the Bulb and Test
Install your chosen bulb (LED bulbs are recommended for energy efficiency and longevity), restore power at the circuit breaker, and test your new pendant. If it doesn't light up, turn the power off again and double-check your wire connections.
Common Installation Challenges and Solutions
How to Center a Pendant Light Over a Table or Island
Achieving perfect centering is crucial for visual balance. For rectangular islands or tables, measure the width and find the midpoint. For multiple pendants, calculate equal spacing from the center point outward. Use painter's tape on the floor to mark positions before drilling, helping you visualize the final layout.
Working with Sloped Ceilings
Sloped ceilings require special mounting hardware called a sloped ceiling adapter. Many pendant fixtures are compatible with these adapters, allowing your light to hang straight even on an angled surface. Check your fixture specifications before purchasing if you have vaulted ceilings.
Dealing with Heavy Fixtures
If you're installing a substantial fixture or art deco chandelier that weighs more than 50 pounds, you'll need additional support beyond a standard junction box. This typically involves installing a fan brace or additional ceiling support. When in doubt, consult a professional for heavy installations.
Safety Tips and When to Call a Professional
While DIY pendant light installation is achievable for many homeowners, safety should always be your priority. Here are essential safety guidelines:
- Never work on live circuits – Always verify power is off with a voltage tester
- Check local building codes – Some jurisdictions require permits or professional installation for electrical work
- Don't exceed weight limits – Know your junction box's weight rating and install additional support if needed
- Use the right bulbs – Never exceed the maximum wattage specified by your fixture
- Secure all connections – Loose wires can create fire hazards
You should call a licensed electrician if you encounter aluminum wiring (common in homes built between 1965-1973), need to install new wiring or circuits, or if your junction box needs replacement or reinforcement. The peace of mind is worth the investment.
Choosing the Right Pendant Light for Your Space
Installation technique is only half the equation—selecting the right fixture is equally important. Consider the scale of your room, existing decor, and how the pendant will function in your space.
For kitchen islands, pendants with focused downward light provide excellent task illumination. The Industrial Cage Pendant - 12" offers an open design that works beautifully with vintage-style Edison bulbs, creating warm ambient lighting perfect for intimate gatherings. For dining areas, consider dimmable options that transition seamlessly from bright family meals to romantic dinners.
Curated Pendants for Your Installation Project
When selecting your best height for pendant lights, remember that adjustable fixtures offer flexibility as your needs change. The Brushed Brass Mini Pendant - 8" features an adjustable cord that allows you to fine-tune placement even after installation—perfect for those who like to refresh their space periodically.
Conclusion
Learning how to hang pendant lights opens up a world of design possibilities for your home. With the right preparation, tools, and attention to safety, you can transform any room with beautiful, functional lighting that reflects your personal style. Whether you're drawn to the sleek lines of Scandinavian design or the bold statement of an art deco chandelier, the perfect pendant is waiting to illuminate your space.
At Skonne, we believe that beautiful lighting should be accessible to everyone. Our curated collection of pendant lights combines quality craftsmanship with timeless design, helping you create that warm, intentional atmosphere that makes a house feel like home. From the first measurement to the final flip of the switch, we're here to support your journey toward a more beautifully lit life.
Related Article
LED Chandeliers: Energy-Efficient, Modern Fixtures for Every RoomDiscover energy-efficient LED chandeliers that transform any room with modern style. From dining rooms to foyers, find your perfect fixture at Skonne.